How to Remove Old Wheel Stickers Without Damaging Your Center Caps
How to remove wheel center cap sticker without trashing the cap is simple, use gentle heat, lift the edge with something soft, peel slow, then clean the glue before the new emblem goes on. I learned this crouched next to a wheel with a hair dryer in one hand and way too much confidence in the other. Five minutes later my fingers were sticky and I was one bad decision away from grabbing a screwdriver. This job is easy when you stay calm and stupidly annoying when you rush.
Most damage does not come from the sticker. It comes from the person trying to remove it like they are opening a paint can. I have seen good center caps scratched by keys, pocket knives, flat screwdrivers, and one brave soul who used a kitchen blade, which is the sort of garage behavior that creates stories nobody is proud of. Wheel center caps are small, glossy, and right in the middle of the wheel, so even a tiny slip leaves a mark your eye finds every single time.
When I checked current removal guidance from the companies that live in decals and adhesives, the advice was refreshingly boring. Avery Dennison still tells you to warm the decal, keep the heat source about 15 to 30 cm away, and pull it back slowly at a low angle so the film lifts with less tearing and less glue left behind. 3M says the same basic thing in its current removal notes, soften first, use plastic for residue, and test any adhesive remover on a hidden area before you commit. Boring is good here, because boring keeps your cap pretty.
Why old emblems fight back
Old wheel stickers fail in a few different ways, and each one asks for a slightly different touch. Some go brittle and crack the second you lift a corner. Some peel clean on top but leave a sticky ghost behind that feels like old chewing gum. Some still look solid until a little heat wakes the adhesive up and then they slide off like they were waiting for permission.
I run into four versions of this all the time.
The old emblem is one piece and only lightly tired, this is the easy win.
The face cracks when you lift it, this means more warmth and less ego.
The top comes off but the glue stays, now the real cleanup starts.
The cap itself is faded, chipped, or curved, which changes how careful you need to be before you install anything new.
That last one is where people get fooled. The old sticker hides little scratches, faded paint, tiny chips, or a face that is more curved than it looked under the old badge. Better to find that out before you order the replacement than after it shows up.
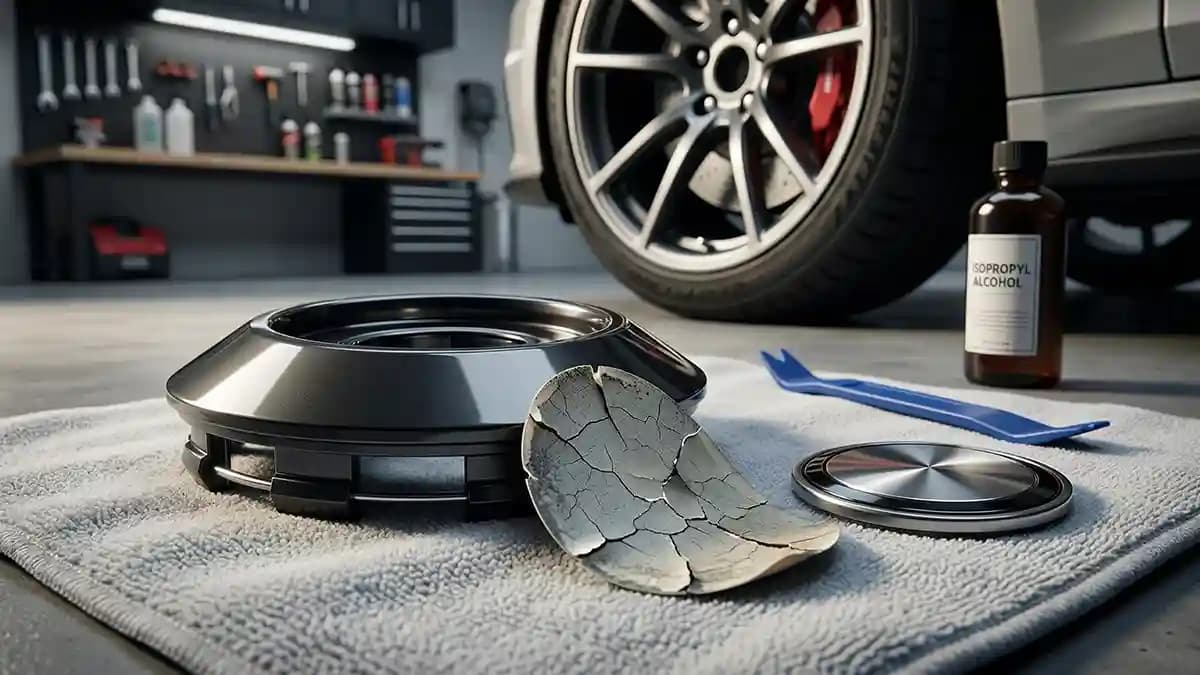
What I put next to me before I start
I keep it simple because simple keeps me from doing something clever and stupid. You want the wheel cool to the touch, good light, and enough time that you are not trying to finish the job between two other things. Rushed hands do dumb work.
My removal kit is just this.
A hair dryer or very gentle heat.
A fingernail, plastic pick, or thin plastic card.
Clean microfiber towels.
Mild car soap and water.
Isopropyl alcohol for the final wipe.
An adhesive remover for stubborn residue.
Goo Gone still tells people to let the product sit for a few minutes, loosen the edge with a soft plastic scraper or even a fingernail, and then wash the area after. 3M says much the same in its current removal bulletin, let the remover work, use plastic to lift softened residue, rinse, and dry. That is why I leave the metal tools in the drawer and let patience do some of the work.
My step by step routine to remove old emblem material
I start with a basic wash. Not a full wheel detail, just enough soap and water to knock off brake dust, road film, and whatever greasy grime is sitting around the badge. If you heat dirt into the job, you are just making a little scratch paste and rubbing it around a shiny cap. Dry the cap well before the next step.
Then I warm the sticker. I move the heat around and keep it gentle, because this is softening, not cooking. Avery Dennison still puts typical removal heat in the 30 to 60 second range with some distance from the surface, and that lines up with what works for small wheel badges too. A cap does not need drama, it needs a little warmth and a little time.
Once the face softens, I lift one edge with my fingernail. If the edge is too tight, I go to a thin plastic card or plastic pick, never a screwdriver, never a key, never the random bit of metal that suddenly seems like a good idea when you get impatient. Avery has broader removal documents that mention sharper tools on some surfaces, but on a little painted or plastic center cap, my rule stays the same, soft tools only.
When I get a corner up, I peel the sticker back low over itself instead of yanking straight up. That low pull angle helps reduce adhesive transfer, and current Avery guidance still calls that out clearly. If the sticker fights me or starts tearing into tiny pieces, I stop, add more heat, and keep going slowly. Most bad removals happen right there, in that moment when a person decides force is faster than patience.
How I clean center cap adhesive when the glue stays behind
This is the ugly part, but it is still easy if you stop trying to scrub your way out of it. I warm the residue a little, apply a small amount of adhesive remover, let it sit, then work the softened glue with plastic or a folded towel. The goal is to lift the mess, not grind it into the surface. If the residue smears, I wait a touch longer instead of pushing harder.
I use this exact order.
Light warmth on the residue.
Small amount of remover.
Short dwell time.
Plastic tool or towel to lift the glue.
Repeat only where needed.
3M’s current bulletin says to let the remover penetrate, scrape softened residue with a plastic applicator, and repeat as needed. Goo Gone says the same thing in simpler house language, let it work, lift the sticky mess, then wash the area. 3M also tells you to test your remover in a hidden spot first, which sounds obvious until you remember how many different cap finishes, paints, and plastics are out there.
WD 40 and Goo Gone both still have current products for sticker or adhesive residue, and Goo Gone currently lists plastics as safe when used as directed. I still use a little, not a flood, because this is a cleanup job, not a sauce recipe. Put on enough to soften the glue, wipe it off, then wash the cap clean so nothing oily stays behind to mess up the next install.
When I use more heat, and when I stop
Some stickers come off with barely any fuss. Then there are the old sun baked ones that crack, flake, and act like they were glued on by a person with trust issues. Those need more patience, not more violence.
My rule is simple.
If the sticker lifts in one piece, keep the process gentle and keep going.
If it snaps right away, stop and reheat.
If only the face comes off, move to residue cleanup.
If the cap finish starts looking dull, soft, or unhappy, stop and cool everything down.
3M’s current application guidance also warns that overheating film can scorch it or soften it too much. That note is aimed at larger graphics work, but the lesson still fits this tiny wheel job just fine. Heat is your friend right up until you get careless with it.
The one power tool I do not rush to use
There is a reason detailers know the 3M Stripe Off Wheel. 3M still describes it as a tool designed to remove vinyl, decals, tape, and graphics without damaging the surface below. That matters. But for a tiny center cap, especially one still on the wheel, I treat that tool like a last option, not the hero of the story. That caution is my judgment call based on the size of the part.
If I ever use an eraser wheel for this kind of thing, I want the cap off the car, supported, and clearly worth the extra risk. For normal overlay removal, hand work is slower but safer. Slow is not glamorous, but slow is how the cap survives. And once the cap survives, the new badge has a clean place to land.
Prep surface wheel sticker before the new one goes on
This is the step people skip, then they act shocked when the new emblem lifts later. The cap can look clean and still have old glue, polish residue, skin oil, or wheel cleaner sitting on the face. Good adhesion starts with a boring clean surface, not a motivational speech. That is the part nobody wants to hear, because cleaning is less fun than shopping.
My prep routine stays the same every time.
Wash off any remover and loosened glue with mild soap and water.
Dry the cap fully.
Wipe the landing zone with isopropyl alcohol on a clean towel.
Let it flash off.
Do not touch the face again with your fingers.
3M still recommends an IPA and water wipe for many bonding jobs, and its vehicle prep material calls out a 70 percent IPA and 30 percent water mix as a final cleaning step. That lines up with the garage version I trust, clean towel, clean alcohol wipe, clean hands, no fingerprints. The wipe is boring, but boring prep is why the next sticker stays put.
This is also when I measure. A fresh cap face tells the truth. You can see the visible flat circle, the little raised lip, and whether the surface is truly flat enough for a clean overlay. That is why I keep sending people to Millimeters Matter: How to Use Digital Calipers for a Perfect Fit and Finding Emblems for Discontinued Rims: A Solution for Older Cars. Once the old sticker is gone, fitment becomes obvious, and obvious saves money.
What people do wrong right after removal
The funny part is people can do the hard part correctly and still blow the easy finish. They clean the cap, then touch it five times with bare fingers. They leave a thin ring of old glue because it “looks fine enough.” They guess the size from memory, slap on the new emblem, and go wash the car like patience personally insulted them.
So this is my short list of things not to do.
Do not install over leftover glue.
Do not buy the replacement before you see the cleaned cap.
Do not touch the landing zone after the alcohol wipe.
Do not force a badge onto a raised lip.
Do not rush straight to the wash bay after install.
Impossible Stickers says the same basic thing across current product and process pages, clean the area, use the emblem on flat smooth surfaces, and press it firmly. That is why I only send people into the Wheel Emblems section after the cap is cleaned and measured. Fitment first keeps the wheel from looking silly.
Quick Q and A
Q: Can I remove an old wheel sticker with just a hair dryer?
Yes, for many overlays that is enough. Gentle warmth plus a slow peel works better than hard pulling on a cold sticker.
Q: What is the safest tool for lifting the edge?
My first choice is a fingernail. After that, a soft plastic card or plastic pick beats metal on a small decorative cap every time.
Q: How do I clean center cap adhesive after the old emblem comes off?
Use a mild adhesive remover, let it sit briefly, lift the softened glue, then wash the area and finish with an alcohol wipe. The cap should feel smooth, dry, and clean before the new sticker goes on.
Q: Can I use WD 40 or Goo Gone on wheel center caps?
Both brands have current products for adhesive residue, and Goo Gone lists plastics as safe when used as directed, but test first on a hidden spot. Use a little, wipe it off, then wash the cap clean so nothing oily stays behind.
Q: Should I use a razor blade on a center cap?
Not if you care about the cap. For this job, soft tools and patience beat sharp metal and regret.
Q: What should I do before installing the replacement sticker?
Measure the visible flat landing zone, clean it, dry fit the new badge, then place it on a dry surface and leave it alone. Clean install beats fast install every single time.
If you want the wheel to look right again, remove the old sticker like a calm adult, not like a raccoon in a snack drawer. Warm it, peel it, clean the glue, inspect the cap, and only then order the replacement. Do that and the job feels easy. Skip those steps and you end up fighting a tiny circle in your driveway while the neighbors get free entertainment.